November 1, 2016

Awesome Birthday and the tour continues..

We had a good number of trick or treaters last night, I love seeing all the costumes. We left picking up a pumpkin till the very last moment.. We are usually much better at planning. We ended up with these itty bitty little pumpkins that fit in the palm of my hand, I lined them up along the railing and no one seemed to care that we did not carve one.

In between knocks and the doorbell I actually made a card. My Saturday was suppose to be this wonderful creative day, instead I spent hrs sorting my scraps. I found some great DP bits and I figured out I have tons of neutral coloured pieces of cardstock which are now in separate storage so I can take advantage. So this card is made from the scrap bins.

I love layers, it makes for easy cards. This DP is double-sided so that adds to the easy. I heat embossed the sentiment and added foam tape between each layer. I found this cool ribbon in the scrap bin too and it matched so I used it :). I finished with sequins.

Supplies: White and black card stock, Designer Paper Best Creation Inc, Hot off the Press - Birthday Cheer, sequins.

Now onto the tour - this is my fabulous primary desk, I had planned to get one made with all cabinets/drawers under it. When we were at Ikea (a sip of coffee or wine for every mention of Ikea over my last few posts :)) anyhow.. Husband spotted this desk, I prefer to stand when I craft so this Skarsta sit/stand desk is perfect. I am taller and this desk lifts high enough to accommodate my long legs.

I found the Micke drawer set that fits under it nicely, even if I was to lower the desk. I also found this very cool Janinge stool that allows me to sit at my desk should I want to, it will lower or raise up a good span. The Micke and Janinge fit under the desk so they are not in the way. I hide my trimmer and paper cutter on top of the draw set, which is super easy to reach.


I ordered this high quality architects lamp which adds direct light to what I am working on. I have the same bulb in both the ceiling fixture and the lamp for consistency.
On my desk I have my Boon, wire letter holder, scrap bin and self healing mat.

I found these Projs desk pads at the same time I found the desk and they work fabulously under my self healing mats to give a little extra protection to the desks.


A little high level view of a clean work space, and although I usually have a couple of extra items on my desk I typically have it pretty clean between projects. I used Stampin' Up! grid paper over my mats, it cleans up easy and I just fold them up and pop in the recycle bin. The lamp is hiding it but I have small square glass bowl that I store my Absorber in, best clean up item ever.

My new desk is so much more spacious than before, this was my work surface on the old desk, cramped and not a lot of leg room.


That is the card and tour for today,
Nina

October 31, 2016

Merry Monday Christmas Card Challenge #220

Welcome to a Merry Monday Christmas Card Challenge, this week Bonnie is our challenge hostess this week and her challenge is How will you decorate your door.

I went with a gate fold for my card and used this fabulous wood grain paper. I die cut the stitched poinsettia with matching paper and used foam tape between the layers. 

I also popped up the sentiment, I finished with a gem to the center of the flower. 


Supplies: White and black card stock, Designer Paper - American Crafts, Poppy Stamps - Stitched  Poinsettia Trio, Woodware - sentiment, gem.
 
Be sure to stop by the Merry Monday Challenge blog to play along.

Cheers,
Nina

October 29, 2016

Autumn colours and more craft room.

Happy Saturday : ) it was such a warm and gorgeous day yesterday, right now mother nature is all doom and gloom out there. Perfect for a little time in the craft room.

I will create something new today but I am sharing a card that I made last week.


I was playing with clear embossing and a background stamp. Then I used my distress markers for a little watercolour fun. I added in some copper flicks once everything was dry.

The sentiment is heat embossed then popped up. The card is for someone musical so I added a little die cut music note.

Supplies: White and kraft card stock, Hero Arts - Rings bold print, Clearly Besotted - Many Mini Messages, Poppy Die - Melody Music.

Continuing on... craft room part deux.

This is the mess that was the second bookshelf, paper pads of all sizes and misc items everything. This bookshelf was not well used, as in it was like the items stored there were in a black hole.


Zones (see mention in previous post) come into play here again as I reconfigured the new cabinets, this is where I store my 6x6 papers pads. Yes there are lots of them ;) I have an addiction. I have them mostly sorted by company. I also have some misc items and tools on the top 2 shelves.

Mid way, my cube ink pads. Cardstock, envelops and adhesive are next. I buy my adhesive, envelopes in bulk, same with the cardstock for my card bases.


This is a side view of that whole wall, my room is 10 by 10 but I lose area with a closet, window and the door.

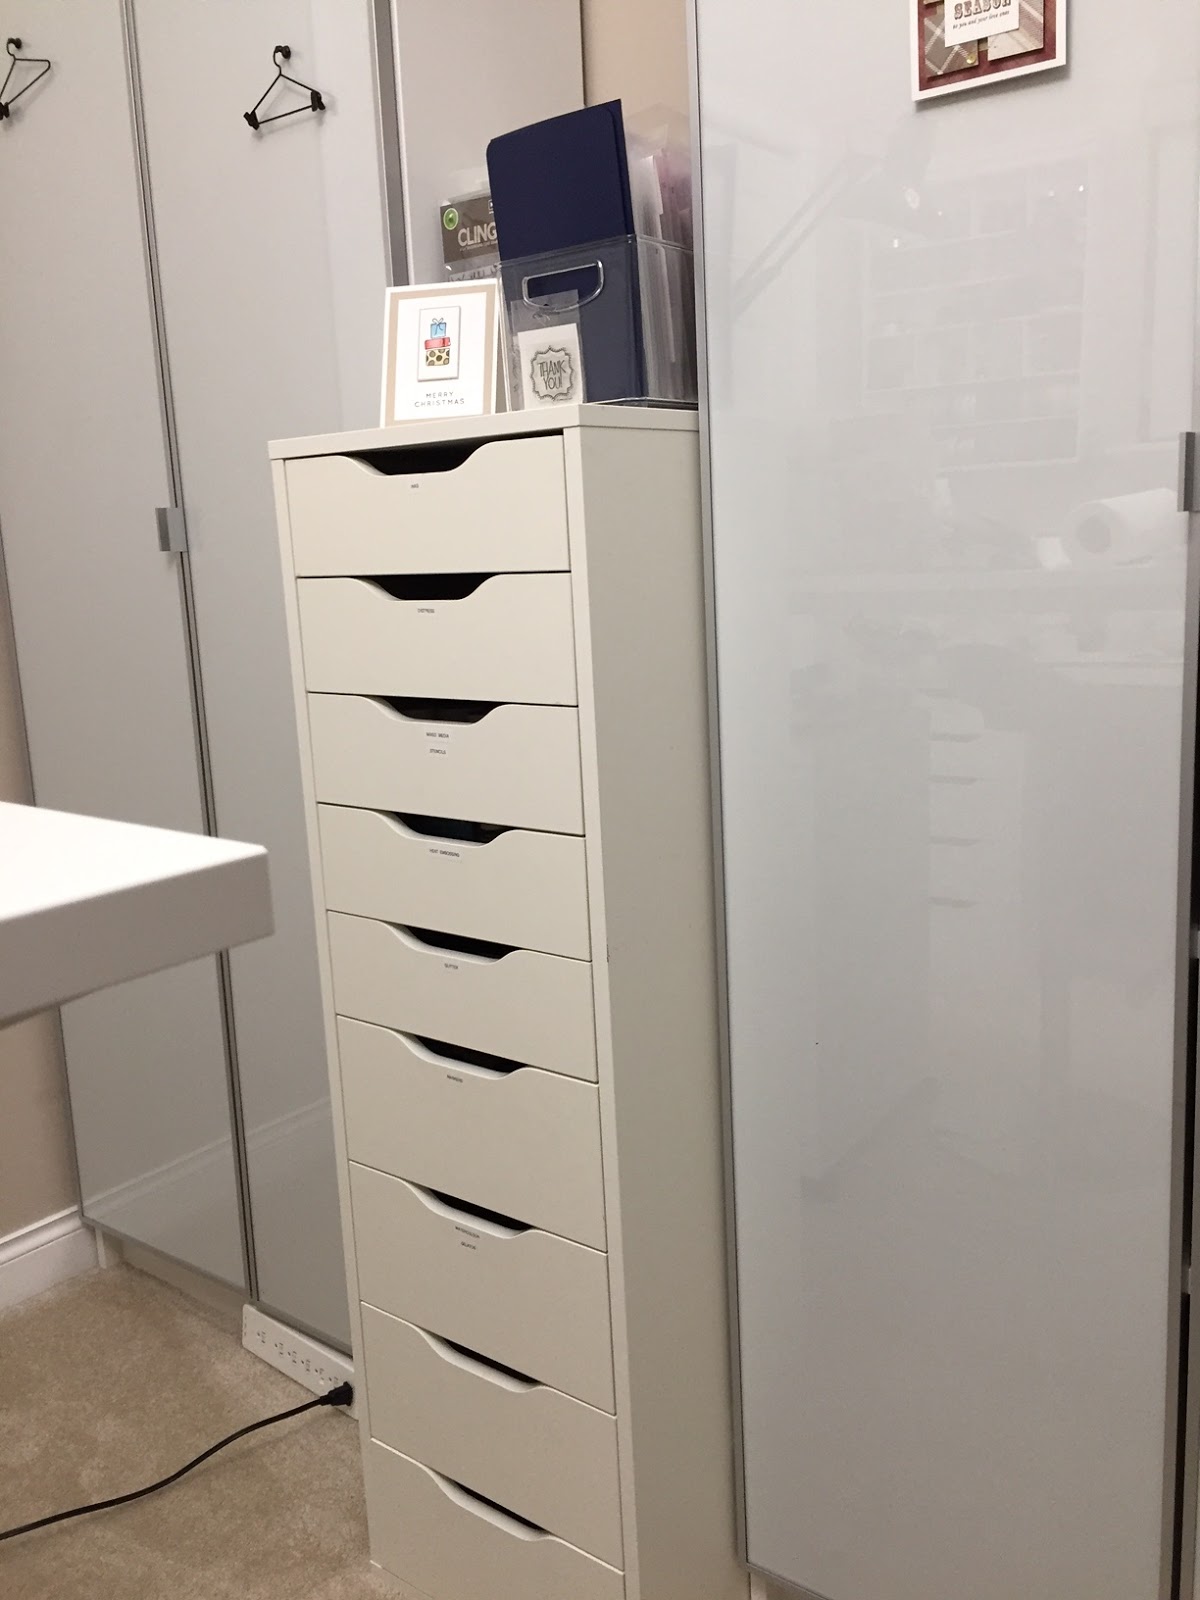
Alex, (one of 5) stores from the top down.. Inks, Distress, mixed media, heat embossing, glitter, markers and watercolours. On top I have my over sized stamp packages, as well as my bin of The Stamps of Life stamps.


Until next time :). Enjoy your day.
Nina

October 27, 2016

Wonderful Birthday and craft room

I seem to be in this double sided, simple layer phase. I will admit to having an obsession with 6 x 6 paper pads, especially ones with double-sided prints. I created this card a while back but I still seem to be following this pattern.

I used simple layers adding a thin cardstock mat behind my DP. I popped up the sentiment with foam tape and finished with some sequins.


Supplies: White and brown cardstock, Designer Paper - Teresa Collins, Penny Black - Sprinkles and Smiles, sequins.

I revamped my craft room this past summer, I have had a couple of people ask to see what I have changed. Selfishly I wanted to wait until my sis had come for a visit so she had first peek.  I am not going to post all the pictures at once.. there has to be a little mystery :).

I have been procrastinating about a change to my space for a couple of years, but it was all talk and not a lot of action.  I was invited to a revealing of another craft room and I won a consultation from Orca Organizing. Wanda was fabulous, I had a good idea of how I wanted the layout of my room to look but she gave me some great ideas like creating zones in my room.

That pretty much spurred me into action, I did not want to be embarrassed by my space so of course I had to do some changes before my meeting. It is a little like cleaning the house before the housekeeper comes. Crazy I know.

I had designed what I wanted the craft room to look like with the help of the room design app from Ikea, it helped that all the furniture that I was going to purchased was from there and some of the storage units I already owned are from Ikea. 

So first off here are a couple of pictures of 1 of the bookshelves I had, I had it for over 20 years and its was not the best to begin with. This one held stamps and a variety of cube inks in small draw units and well as paper pad and random other things. The bottom was all tech stuff which was banished from the room as it was transformed.

I did not like having my supplies on display  so my goal was to find cabinets or shelves with doors. I found these beautiful ones at Ikea (Billy/Morliden), even through they were not as deep as the previous bookshelves I was determined. This is were one of the zones come into play, stamps..

These suckers are heavy, we had to secure them to the wall first off. I found the cutest little hangers that are perfect for displaying cards. The glass fronts are made so that you can put something in behind them, wallpaper or whatever but my room is mostly white so I left them as is.


Don't judge me... This is many years of collecting stamps. I used InterDesign Fridge bins, I started with Ikea Variera box which worked great but the rounded edges limited how many I could use per shelf. The InterDesign ones are a perfect fit for the stamps.  I love that I can pull out a bin or two when I am creating a card then the whole think just get put back in its place.

I like using original packaging where I can and I like to store them by manufacturer rather than theme. I have clear and cling on the top selves, wooden near the bottom. I used a label maker for labeling the bins.

I have some of my coloured cardstock on the bottom and my spellbinders on the bottom right.


See you soon with some more pictures.

Thanks for visiting,
Nina

October 24, 2016

Merry Monday Christmas Card Challenge #219

Welcome to a new Merry Monday, Sue is our Hostess this week and we are to Create a Christmas card using a bird(s)on it.


I made a simple rustic style card, I layered cardstock and DP. I added some foam tape to the top panel and sentiment and finished with a button and twine.

 
Supplies: White cardstock, gold paper,  Designer Paper - Photoplay, sentiment - Woodware, sequins.

Be sure to stop my the Merry Monday blog to see what the design team had created.

Thanks for stopping by,
Nina

October 22, 2016

The Challenge #83

Good Morning and welcome to a Christmas Inspiration Challenge this week for The Challenge.
I chose a simple design for my card. I coloured the presents using distress inks then added some Glossy Accents and wink of Stella.


Supplies: White and Kraft Cardstock, Simon Says Stamps - Gifts of Love and die cuts.

The Challenge design team has created some fabulous cards, take a look and play along.

Thanks for visiting,
Nina

October 17, 2016

Merry Monday Christmas Card Challenge #218

Merry Monday, we have a new challenge for you this morning. I am the hostess this week and the challenge is to Create a Christmas card using plaid.


There are so many great plaid papers and stamps out there right now, I can't wait to see what you all create.

I used lots of layers on my card, and a fabulous double sided paper that had wonderful plaid


Supplies: White cardstock, gold paper,  Designer Paper - Photoplay, sentiment - Woodware, sequins.

Be sure to stop my the Merry Monday blog to see what the design team had created.

Thanks for stopping by,
Nina

October 15, 2016

The Challenge #82

I live in a beautiful place, sometimes though when you get all caught up in life you can loose that sense of wonderful of the things that surround you. A couple of weeks ago my sister came for her annual Oct visit. We traversed my island, as well as getting lots of crafty time tp play.

My sister is full of adventure and talked me into staying up in Parkville overnight, Tigh-na-mara Resort holds a special place in my heart so I was able to coerce her into staying there. We did not time it quite right because the tide was in, but we still walked  a couple of beaches and enjoyed a on the go breakfast watching the waves.

So along with this pretty inspiration photo I also have our up island adventures to inspire me for this weeks The Challenge.


I love these soft pretty papers by Pion, my card has lots of layers. The bottom layer is a view of the ocean, hidden behind the panels are tiny little boats on the horizon. I added a panel of light woodgrain, I added two tags, one popped up with foam tape.

I added some clear dew drops on top for shimmer sequins for the tops of the tags, and used some rustic twine with a whale tail charm. I finished with a popped up sentiment.


So.. don't forget the simple things, sometimes they bring you the greatest joy.

Supplies: White and brown cardstock, Designer Paper - Pion, Technique Tuesday - Love Bug Jar, charm, twine, sequins and dew drops.

The Challenge design team samples are amazing, take a look and play along.

Cheers,
Nina

October 10, 2016

Merry Monday Christmas Card Challenge #217

Good morning and Merry Monday, we have a new challenge for you this morning. Lori's challenge this week is the Create a Christmas card with a vintage/retro theme.

I found this wonderful paper on my travels last week with my sister. I love how this card turned out. I used stitched die cuts to precision cut this section from a 12 x 12 page, I then created a larger panel from the opposite side of the paper. I added a vintage style sentiment and finished with some moonshine sequins.

I am not sure if this is a little elf or little girl, but with the lantern I love this vintage scene. I popped the layers with foam tape to add some dimension.


Supplies: White cardstock, Designer Paper - Pion, Cornish Heritage Farms - Vintage Christmas, sequins,

Be sure to stop my the Merry Monday blog to see what the design team had created.

Cheers,
Nina

October 8, 2016

The Challenge #81

Happy Thanksgiving weekend to all my Canadian visitors, I hope you are getting some quality family and friends time.

Sometimes you just need a paper hug, good morning all and welcome to a new The Challenge. This week we have a colour challenge.

I started with the sentiment that I heat embossed in gold on vellum. This picture does not do it justice. I used a blend of stitched die cuts from MFT and SSS and finishing with some gold sequins.

Supplies: White and turquoise card stock, Designer Paper - Echo Park, vellum, Hot off the Press - Heartfelt greetings, Simon Says Stamps and My Favorite Things die cuts, sequins.

The Challenge blog has some wonderful inspiration created by the design team, so be sure to stop by and take a look. We hope you can play along.

Thanks for visiting,
Nina