May 31, 2020

Just Add Ink #507 - Congratulations

It's a crafty kind of day, I have a second post for today so I hit the magic 31 posts for May as I catch of for one of the days I missed when I took a couple of sick days.

I am playing along with Just Add Ink. I was in need of a little inspiration and this sketch was perfect.

I am using both sides of a double-sided 12x12 page, another that had been in my stash for a while. I cut the panels then added a cream beige textured cardstock in behind. I used a round punch to cut out a piece from the DP for the heart then layered that as well.

I stamped the sentiment and layered it with cardstock and designer paper before adhering some foam tape.


Cheers,
Nina

CAS(E) this Sketch! #374

I am playing along with CAS(E) this Sketch! this morning.


I have had this sheet of designer paper in my stash for a long time and I always think to myself you have got to use that. This sketch is perfect to show it off.

I cut a panel then added a layer of black cardstock. I heat embossed the sentiment in gold on black cardstock then added layers of DP, white and black cardstock before popping it up with foam tape. I finished with black gems.


Supplies: White and black cardstock, Designer Paper - American Crafts, Memory Box - Art Deco you are Wonderful, gems.

Thanks for stopping  by,
Nina

May 30, 2020

Just Saying Hello... Again

A quick second post for the evening, I thought I would finish off what was left of this Designer Paper. This is the backside of the paper from the earlier post. I fussy cut a second flower and popped it up with foam tape. I then added a layer of black cardstock to the panel.

I heat embossed the sentiment in white on black and I layered a piece of scrap designer paper and black cardstock before popping it up with foam tape. I finished with some gems.


Supplies: White and black cardstock, Designer Paper - Imaginisce, HeroArts - CL342, gems.

Thank for visiting,
Nina

Just Saying Hello

As I was digging through my scraps and found a half sheet of this pretty paper from Imaginisce and it inspired me after three false starts on cards today.

I used a simple layout and let the paper do all the work, I cut a panel then added a layer of black cardstock. I stamped the sentiment and layered it as well and added some foam to adhere to it. I added some black gems to the flowers then popped the whole panel up with foam tape.


Supplies: White and black cardstock, Designer Paper - Imaginisce, HeroArts - CL342, gems.

Thank for stopping by,
Nina


May 29, 2020

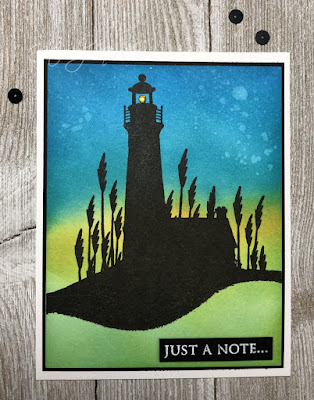
The Male Room Challenge #137 - Landscapes

Good Morning and Happy Friday, I am playing along with the challenge over at The Male Room today.


I made an impulse buy a few weeks ago and ordered some stamps from Blue Knight Rubber Stamps. I was very impressed with the customer service and the order was processed super fast and arrived pretty quickly as well. 

Most of the ones I purchased are silhouette style and I think this lighthouse stamp worked wonderfully for this challenge.

I used Distress inks on a smooth piece of cardstock doing some blending with blues, greens and a little yellow. Once that was dry I used one of my edges die cuts from Lawn Fawn to create a mask shaped like a hill. I then stamped the lighthouse image using my Misti.


I let that dry for a little while then used a coffee filter to cover the image as I sprayed a little sparkle shimmer spritz, my goal was a shimmery night sky but some of the drops turned out a little large and reacted with the distress ink, I like how it turned out though. I added a layer of black cardstock for a thin frame.

I heat embossed the sentiment in white on black cardstock and popped it up with foam tape. I finished with a yellow gem for the lighthouse light.

Supplies: White and black cardstock, Blue Knight Rubber Stamps - Lighthouse Silhouette, Hero Arts - CL342, distress inks, Shimmer Spritz - Sparkle, gem.

Cheers,
Nina

May 28, 2020

Tuesday Morning Sketches #556 - Kindness

I am playing along with this week's Tuesday Morning Sketches challenge.

I die-cut a layer of patterned paper using my stitched rectangles then added a layer of black cardstock. I stamped the image and fussy cut it then added a smidge of colour with some watercolour pencils.


I added some crochet thread then added a stitched ring of black cardstock, I added some foam tape in behind the flowers. I stamped the sentiment then cut it with a slightly uneven edge then added a layer of black cardstock.


I finished the card with some dark blue gems.

Supplies: White and black cardstock, Designer Paper-Craft Consortium, Simon Says Stamp - Uplifting Thoughts, Stitched Rectangles and circles, gems.

Thanks for stopping by,
Nina

May 27, 2020

Thinking of You

A crafty class from afar made my evening last night. We tackled a pocket card and it is always wonderful to see what everyone creates.

I am not sure how I managed to put together a card with all the fumbling and bumbling that goes on at my craft desk during these classes. The supplies were all pre-cut, not that it helped over half were wrong (insert eye roll here). 

For some reason, even with picture of what we will create, I can not seem to wrap my head around the finished product we are trying to create, which usually generates some shenanigans in my craft room as I scramble to adjust the supplies I thought I would use.

Anyway, it turned out better than expected. I think I am going to add a little folded stand at the back so it can hold itself up.


My first error was that I had a regular card base in my head, I ended up with all these panels of white cardstock. As we started to put everything together I finally started to envision what it looks like and looked for alternate cardstock. It is a good thing I have large scraps at my fingertips that fit the bill, although it still took two tries to get a piece cut correctly.

After everything is put together, many follies later the end result was turned out ok. My engineer's cap was a little off-kilter when I decided to use sequins to cover glue smudges, I am sure they will get flicked off the first time the little inner panel gets pulled out. 

I coloured the leaves and flowers with watercolour pencils then use a Zig shimmer pen to blend the colours and add a little sparkle. I fussy cut the outer flower and popped it up with some foam tape.


Supplies: Kraft, brown and white cardstock, Designer Paper - Pink Paislee, Simon Says Stamp - Sketched Flowers, sequins.

Enjoy your day,
Nina


May 26, 2020

Happy Belated Birthday

Is it really only Tuesday evening, it feels like I should be farther along in the week already. I have a masculine card for tonight's post. 

I cut a piece of designer paper then layered it up with black and grey cardstock, I took a strip of the same paper using the backside and added a layer of black cardstock. I heat embossed a patch of paper with the pewter cement embossing powder that is older than dirt and then die-cut mini gears from it.

The embossing powder is old enough it does not melt very well anymore so little bits fell off the die-cut pieces giving them an aged look. I added some small drops of black Nuvo drops then finished with the sentiment which is heat embossing in white on black cardstock and popped up with foam tape.


Supplies: White, grey and black cardstock, Designer Paper - Craft Consortium, PaperTrey Ink - Birthday Bash, Memory Box - Mini Gears, Nuvo drops.

Cheers,
Nina


May 25, 2020

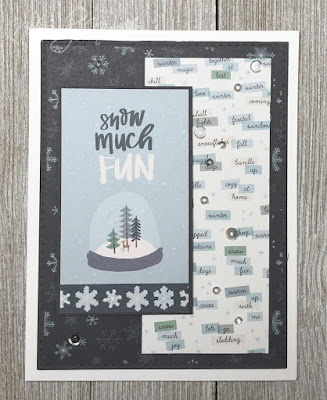
Keeping Christmas May 2020 - Snow Much fun

Keeping Christmas May 2020 - Snow Much Fun

Good Morning all, welcome to the May Keeping Christmas Blog Hop.


For my card today I die cut a panel of grey cardstock and added a layer of Designer Paper, I created a second this rectangle panel for along the right side and layer that with grey cardstock as well. For the sentiment I used a panel form the paper and layered it and added some foam tape. I finished with some moonlight sequins.


Supplies: White and grey cardstock, Designer Paper - Carta Bella, Simon Say Stamp - Stitched rectangles, sequins.

Follow along with the other crafters in the Blog Hop for more inspiration.


 Nina Forsyth ( You are here)

Thank you for stopping by,
Nina

May 24, 2020

Art

I don't know about you but I have way too many embossing powders in my stash, some pretty old and that I would not trust to melt the way they should.

I was watching a YouTube video on some ideas on how to use them and decided to try a panel with a blend of powders.

I used two colours of blue, cream and pewter. It turned out better than I expected the pewter turned out more of the dull cement texture and colour. I added a layer of grey cardstock, a sentiment and a paintbrush from the same stamp set as the sentiment. Both sentiment and brush are popped up with foam tape.


Supplies: White and grey cardstock, Penny Black - Artful.

Thanks for stopping by,
Nina

May 23, 2020

Happy Birthday - Masculine

I was digging through my papers to look for inspiration and came across this 12 x 12 paper pack I had purchased moons ago and have opened yet. The paper pack is called Oxidation by Ella & Viv.

I decided on a simple design to let the paper do all the work. I used my stitched rectangles to die cut a panel then added a layer of texture brown cardstock. I pulled out some coffee colours glimmer mist and gave the panel a couple of spritzes. I popped the whole panel up with foam tape.


I stamped the sentiment and added a layer of the same brown cardstock and spritz that too, this is also popped up with foam tape. I finished with some brown Nuvo Drops.

Supplies: White and brown cardstock, Designer Paper - Ella & Viv, Tattered Angels - Glimmer Mist, Nuvo Drops.

Thanks for visiting,
Nina

May 22, 2020

Sending Hugs

The card for this evening's post is quick and simple. I had yet to break into a new paper pad of marble design, these fun sunny colours made me happy. I die cut a panel using my stitched rectangles then added a layer of black cardstock. I added splatters of gold, silver and black watercolours.

I stamped the sentiment then added a layer of black cardstock and popped it up with foam tape.


Supplies: White and black cardstock, Designer Paper - P13, Simon Says Stamp - Sketched Flowers and Stitched Rectangles.

Thanks for stopping by,
Nina

May 21, 2020

Truth Duty Valour

My stepson had his graduation ceremony from RMC today, this is the card I made for the occasion.

I cut a piece of black cardstock and added strips of red, white and black cardstock, I ran the whole panel through my Bigshot in an embossing folder. I printed off the RMC emblem and layered it with black cardstock and foam tape.

I stamped the sentiment and layered with red then black cardstock, I secured it with foam tape. I finished with some small black sequins with a matte finish.


Supplies: White, black and red cardstock, RMC Crest - RMC Website, Technique Tuesday - Greenhouse 04-12, sequins.

Thank for stopping by,
Nina

May 20, 2020

Tuesday Morning Sketches #555 - A very good day.

I am playing a playing along with this week's Tuesday Morning Sketches.


This sketch has my brain working on a) if I could turn the sketch and still make it work. I always struggle a little with landscape cards and b) how could I incorporate the design elements without using an edge die or punch (same issues as a :))

I still had the paper pad and elements on my desk from the fun fold card from last week and I saw the cool pink wave design.

I cut the base panel and added a layer of dark grey cardstock, I cut the piece of designer paper with the wave design and a layer of cardstock. There are some wonderful tags and ephemera elements in the package so I pulled out two pieces and added some twine for some foam tape to pop them up. I finished with a small tassel and some gems.


Supplies: White and grey cardstock, Designer Paper - Pink Paislee, gems.

Thanks for stopping by,
Nina

May 19, 2020

A thousand Thanks!

A quick and easy card for my post this evening. Sorry, I have been MIA the past couple of days, a nasty bout of food poisoning took me offline for a bit.

I used a panel I had made in my stash with Infusions ink and some spatter of watercolours in gold and silver. I used my stitched squares to die cut the panel then added a layer of black cardstock.

I stamped the sentiment in black then added a layer of black cardstock and popped it up with foam tape.


Supplies: White and black cardstock, Penny Black - Grateful heart, Infusions, Simon Says Stamp - stitched squares.

Thanks for stopping by,
Nina

May 16, 2020

Hello again

A super quick card for today's post, I used one of my goto sketches. I cut a panel of brown cardstock and added two panels of designer paper from a paper pad. 

I separated the panels with a small strip of brown cardstock. I stamped the sentiment then added a layer of brown cardstock and popped it up with foam tape.


Supplies: White and brown cardstock, Designer Paper - Carta Bella, Poppy Stamps - You are Wonderful.

Thanks for visiting,
Nina

May 15, 2020

Hello

I have the day off today, I took a nice long walk this morning. When I came home I made a card and I will have lunch in the park with a friend. This afternoon I will spend a little time in the garden. I can't have asked for a better day.

This card came together pretty easy, I saw the rounded shape used on a card on Facebook and made that the start of my card. I have used a piece of black cardstock as a frame then cut a piece of designer paper for the right-hand side. I cut a second piece and used a scalloped edge border die to shape it.


I loosely aligned a piece of black cardstock and die cut that with the scalloped edge and adhered it to the other panel. I put a layer of foam tape behind.

I die cut the rounded letters, I used a Frost Versamark and clear embossing powder on them then popped them up with foam tape. I fussy cut some of the leave from a scrap of the designer paper then put it all together. The last step was to put a really light coating of Nuvo shimmer pen on the leaves.

Supplies: White and black cardstock, Designer Paper - Basic Grey, Simon Says Stamp - Rounded Alphabet, MFT - Scallop Basic Edge.

Thanks for stopping by,
Nina

May 14, 2020

Wonderful Friends

Good Morning all, I had a lovely evening with some crafty like-minded people last night for a fabulous little demo.

Apparently, I am not very good at following directions, I had all the pre-prep done but when it came to putting it all together and following along with the tutorial that idea all fell apart. While the rest of the group was studiously gluing their cards together I was scrambling to cut panels.

In the end, it all worked out and I loved seeing what everyone created.


On to the card with a fun fold. I placed an order from Peachy Cheap a while back and it arrived late last week, I have had it sitting on my desk just waiting to be used. It includes a paper pad, stamps, embellishments and ephemera.

With the base precut, we scored in the folds. I added the designer paper panel to the base panel. I moved on to the supporting panel, and this was my first error, I thought I heard score at 3 1/6 when it should have 3 and then 6 (insert head shake here) but my  Teflon bone folder to the rescue and 3 1/6 score was pretty much erased.


I moved on to decorating those panels and.. well more scrambling to cut some DP for those, I like how that turned out and I was able to use multiple pages and patterns from the paper pad for the different panels. I realized as I did that though that I had not left a panel to write on. I will figure that out.

Back to the main panel, I added designer paper to the remaining to panels and glued on the supporting panel.  The card was mostly put together at that point so I decorated using ephemera (popped up with foam tape) and epoxy sticker sentiments, I finished using some gold half pearls to match the gold on the moth.

Supplies: White and brown cardstock, Designer Paper, ephemera, epoxy stickers - Pink Paislee, gold gems.

Thank you Crystal Flanagan-Johnson for the fun tutorial.

Cheers,
Nina

May 13, 2020

Keep Smiling

I got a little lazy with my card for today, I let the Designer Paper do all the work for me.

I created a panel making sure to include pretty flowers in the lower corner, I added a layer of black cardstock in behind. I cut a strip of complimentary paper and added a layer in behind that as well.

I used a sentiment square from the same paper pack and  I added a layer of black cardstock and foam tape to pop it up. I added a little bit of ribbon and a bow, I finished with some gems.


Supplies: White and black cardstock, Designer Paper - Authentique, ribbon, gems.

Thank you for visiting,
Nina

May 12, 2020

Tuesday Morning Sketches #554 - Thinking of you

I may have gone a little overboard with this card I just kept layering elements, but I do like the end result. I am playing along with Tuesday Morning Sketches.


I started by using a background stamp and creating two panels with a script on them. I used one to die cut the butterfly and the other for the main panel. I added a round mask then I used distress inks to add colour.

I used a stencil after that was mostly dry to add some Nuvo Mousse in Tuscan Gold and Mustard Seed (bronze).

I die cut the butterfly on the second panel of cardstock with script print on it and added some distress ink and then die cut a second one out of vellum. I added a layer of foam tape between the layers of the butterfly body to give it a little lift. I heat embossed the sentiment in white on brown cardstock and finished with a gem on the butterfly body.


You can see the masked circle behind the butterfly and if you look closely you can see the script on the butterfly wings.

Supplies: White and brown cardstock, vellum, Penny Black - Script, Kaisercraft - Birch, Butterfly - KFF0010, Hero Arts - CL342, gem, Nuvo Expanding Mousse.

Thanks for stopping by,
Nina

May 11, 2020

Magic of the Season

Good Morning and Merry Monday.

It was a stunning weekend here weather-wise and I love that I was able to spend some time outdoors. My son and I did a nice hike Saturday for an early Mother's Day. It was my first official hike of the season. The location was remote enough that social distancing was a breeze.

Most of the trail is going up or down with some pretty rocky areas, this a beautiful part of the trail.


The scenery when we stopped for lunch was spectacular, the view was absolutely stunning.


Moving on, I used a pretty easy layout for my card today, multiple panels all with a layer of black cardstock in behind. The sentiment is simple stamped, matted and popped up with foam tape.


Supplies: White and Black cardstock, Designer Paper - American Crafts, Penny Black - Christmas Cheer, Nuvo Drips.

Thanks for stopping by,
Nina


May 10, 2020

It's the Little Things

Good evening and Happy Mother's Day. My card is CAS and was very easy and quick to put together. 

I heat embossed with a background stamp in black then used Distress inks to added shades of yellow. I used an edge die to create the stitched and scalloped bottom layer.

I stamped the sentiment and popped it up with foam tape.


Supplies: White and black cardstock, watercolours paper, Simon Says Stamp - MOD flowers background, Penny Black - Heartfelt, MFT - Scallop Basic Edge 2.

Thanks for stopping by,
Nina

May 9, 2020

Incredible

Layers, layers and layers for this card. Each panel has a layer black cardstock panel behind. The top layer is popped up with foam tape. The sentiment is simply stamped with a small amount of foam tape behind and I finished with some black gems.


Supplies: White and black cardstock, Designer Paper - Simple Stories, Simon Says Stamp - Amazing, gems.

Thanks for stopping by,
Nina

Beautiful

Somehow in the busy of a Friday, I did not get a card done, or post a back up for those days I don't get creative time. Looks like there will be a double post today :).

This card was made back in February, it is the last of that batch. This graphics 45 paper went along the way and was a good find.

I used a simple layout for this card, each layer is backed by black cardstock to add a frame. The top panel is popped up with foam tape and I finished with some black gems.


Supplies: White and black cardstock, Designer Paper - Graphics 45, gems.

Have a great Saturday,Nina


May 7, 2020

Sincerest Thanks

I am playing along with Tuesday Morning Sketches for today's post.


I cut two pieces of patterned paper then glued them to a brown cardstock panel. I die cut the modern leaf circle die then used a stitched circle die to create a second stitched outline. I die cut a circle from vellum to put in behind and popped up with foam tape. The sentiment is simply stamped I made one of the strip into a flag and adhered to it the circle.


Supplies: White and brown cardstock, Designer Paper - Carta Bella, vellum, Clearly Besotted - Miniature Type, Memory Box - Modern Leaf.

Thanks for visiting,
Nina

May 6, 2020

You are my sunshine

Goodness, I am tired this week, I did not feel like making a card after work today so I am posting a card I made back in February.

I have had this lemon paper for a while, I like it but I just could not envision a card with it. I kept it in my stash going from crops and retreats for probably close to a year. Then came along this sentiment and well a card was made.

I did a horrible job of the photo but here goes anyway. I used both the front and back of the designer paper, I added a layer of black cardstock to each panel. I heat embossed the sentiment in black then layered it and popped it up with foam tape. I finished with black gems.


Supplies: White and black cardstock - Designer Paper - American Crafts, Simon Says stamps - Greetings Mix 1, gems.

Thanks for stopping by,
Nina

May 5, 2020

Spread Kindness

This paper pad came in the mail the other day and it was calling to me. I used my stitched rectangles to die cut two patterned panels then added a layer of brown cardstock. 

The top layer is popped up with foam tape and it is securing the ribbon. I stamped the sentiment added a layer of cardstock then popped up one side to match with the panel.


Supplies: White and brown cardstock, Designer Paper - Soul Mate, Simon Says Stamp - Uplifting Thoughts and stitched rectangles, ribbon.

Thanks for stopping by,
Nina

May 4, 2020

Season's Greetings

A quick and easy one layer card for this evening's Merry Monday post.

I masked off the area I wanted to added colours too, then used Distress Inks to create a background. 

I added some water splatters to pull up some of the ink and added some shimmer by flicking clear Nuvo pen.

I stamped the image and sentiment to finish.


Supplies: White cardstock, Technique Tuesday - Greenhouse 11-12, Hero Arts - Christmas Messages.

Thanks for stopping by,
Nina

May 3, 2020

Happy Mother's Day

I am not playing along with a challenge for today's post, this card is from my stash. I used simple layers, I cut a patterned panel with stitched rectangles then added a layer of brown cardstock.

I stamped the sentiments they added a layer of cardstock and popped them up with foam tape.


Supplies: Cream and brown cardstock, Designer Paper - Dress my Craft, Simon Says Stamp - Stitched rectangles, Stampen' Up! - Crazy about you.

Thanks for visiting,
Nina

May 2, 2020

CAS(E) this Sketch! #370 - Thanks for everything

Good evening, I am playing along with CAS(E) this Sketch! for today's post.


I taped off the pattern for this sketch with thin painters tape on watercolour paper. I heat embossed in white this background pattern. I used distress inks in yellows, greens and blues for the panels. I added a layer of black cardstock in behind the panel.

I stamped the sentiment added a layered of cardstock in behind and popped it up with foam tape. I finished with some black gems.


Supplies: White and black cardstock, watercolours paper, Simon Says Stamps - Flora Background, 

Thanks for stopping by,
Nina

May 1, 2020

Smile

There seems to be a long list of challenges doing Anything Goes this week, so instead of playing along with just one, I am playing along to my own Anything Goes.

In reality, this paper pad inspired me and the card just flowed so... it is also my husband's birthday today (The buck card from Tuesday is for him) and I have a cake to attempt to decorate after work so I know cardmaking is not on my agenda today.

I started with the polaroid journal card which I die cut from black cardstock, I popped it up with foam tape I wanted the patterned panel below to continue past the polaroid element. I added a layer of black cardstock to the two bottom layers as well. I die cut the sentiment from the same patterned paper as the bottom panel then popped it up with foam tape. 


The camera is die cut from black cardstock and popped up with foam tape, I used a round dew drop for the lens. I added additional dew drops as accent elements at the top and bottom of the card.

Supplies: White and black cardstock, Designer Paper - Carta Bella, Sugar Pea - Polaroid Journal card, dew drops.

Cheers,
Nina