August 31, 2011

A little white space and a Midas Touch. I thought I would try to tackle two challenges with one card again. I think I might just have pulled it off.

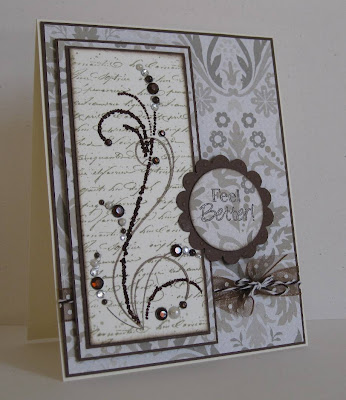
The first challenge is for 365 Card Challenge-Day 183- White Space, this is the sketch, I think the title tells the tale :).


The second Challenge is for Jingle Belles, see next paragraph for details.

"The challenge direction this week involves a decidedly limited-and gloriously metallic-color palette, since everything king midas touched turned immediately into gold. to widen the possibilities just a little further, we're stretching the point, and asking you to make your holiday cards from gold AND/OR silver, and we'll allow the addition of white AND/OR cream."

I know I did not make the card from Gold or Silver, but I did use Gold so I might disqualify myself but I though I would go for it anyway. And as I go to post to the Jingle Belles site, I see I missed the deadline... karma for not enough Gold maybe.....


I embossed the card base then I used my Poinsettia Spellbinders to make multiple flowers, I also embossed them with my poinsettia embossing folder, I stamped Seasons Greeting on a circle, added a little gold dove. I finished with some Gold and Holly Stickles.

Supplies: Kraft and red cardstock, Designer Paper-Penny Black, American Crafts-Merry Mint, Hot of the Press- Tiny Words and Images, Spellbinders-Nestabilites, Sizzix- Poinsettia Embossing folder, Misc circle punches, Stickles.
Cheers,
Nina

August 30, 2011

A second quick post. This is for the Clean and Simple Stamping Challenge.

I made this card on Sunday but hummed and hawed about it. I am not happy with the way the sentiment stamped but love how the leaves turned out. I think I missed the whole color challenge part of this though.

I wanted the sentiment to be darker, and on my test stamp it was. Dumb me though, I put the card together before stamping the sentiment. I sooo know better :P.

I cut these leave with my Sure Cuts A Lot software and my Cricut, found out today they had a conflict and SCAL's new versions are no longer compatible with Cricut, boy am I glad I already brought the software before that happened.

I also used a new embossing folder from Craft Concepts-Garden of Trees. Love Love Love it.


Supplies: Cream and pumpkin cardstock, Designer Paper-Recollections, Hero Arts-Autumn, Leave die-cuts, Craft Concepts-Garden of Trees.

I am off to watch Combat Hospital, night all.

Cheers,
Nina
365 Card Challenge-Day 183-Imagine This-Wrinkled.

I do not have to imagine this, I see a whole lot when I smile in the mirror... its ok, really I earned every little tiny crows feet.. alas that has nothing to do with cards :).

Distressed, crumpled, rumpled and wrinkled it is all the same is it not. Well as I was making this card that is what was going through my head. Not sure if I like my card yet, maybe it will grow on me. I was going for vintage but dare I say this, it looks a bit dirty. Sometimes vintage can be dirty looking I guess so I will go with that.

There was a whole lot of paper crumpling going on to get this rumpled wrinkled look, it would not even flatten enough for me to glue it on straight so that because part of the look. I finished with a small flower and some pearls. There is also a very fine sheen of Sheer Shimmer.

Oh, I need to mention, my sister Barb and I are Weekly Challenge All Stars over at 365 Card Challenge. What that means is that we completed all 7 challenges for last week. I am not sure if I have ever made a card a day before...for a full week but.. Yah us. Take a peak over at my sisters blog to see her fabulous card submissions.

Supplies: Cream and brown cardstock, Designer Paper- Hot off the Press, TPC-Brush Stroke Greetings,Vintage Frame-The Graphics Fairy, Kaiser craft pearls, flower punches, Sheer Simmer.

Cheers,
Nina

August 29, 2011

A quick bonus post for the evening for 365 Card Challenge- Day 182- Buttons and Bows.

What great fun this card was, I had these little bows in my embellishment stash for a very long time. I stamped and cut out candy corns, then embossed them with clear embossing powder to make little buttons.

The little buttons don't seem to want to lay flat but I am hoping they settle a little.

Supplies: Cream and brown cardstock, Designer Paper-DCWV, Stampin' Up!-All Wrapped Up Accessories, Martha Stewart Ombre Bow Stickers, Brown embroidery thread.

Cheers,
Nina
Mickey Mouse and Mojo Monday :).

I love today's Mojo Monday Sketch, I had an idea right away and I am very happy with the end result. I know a sweet little girl who just loves Mickey Mouse and she turns three soon. I hope she likes her card.

I have had Disneyland embossed cardstock and a mouse ears punch since we did a visit to Disneyland a few years ago. A lot longer then one should keep cardstock I am sure. It turned out perfect for this card.

I found an image of Mickey holding a present on the internet, I don't recall the site and when I went to try to look it up I found a dozen of the same image. The printed section the second square is from a picture I found on Small World Memories. Happy Birthday was printed from Microsoft Word, using Walt Disney Font.

I alternated the cardstock for the back gound of the two centre elements, I offset the circle section just a little to allow me to add the scallop for a added little frill. I embossed the mouse ears with some clear embossing powder and added some gems to the scallop to finish.


Supplies: Cream cardstock, Designer cardstock-Disney, Internet images (see above), Microsoft Word-Walt Disney Font, Disney Mickey Ears punch, Kaisercraft gems.

Cheers,
Nina

August 28, 2011

Happy Sunday and a 365 Card Challenge, it is Super Sketchy Sunday.

This is today Sketch:


I received my new Cardmaker magazine in the mail on Friday and I wanted to try the sponging tutorial from inside. Not sure I managed to follow it very well but it was a fun card to make. 

Supplies: Natural white cardstock, Designer Paper-Recollections, Inkadinkado-Halloween/Harvest Assortment,There She Goes-Halloween Additions, EK Success punch.

Cheers,
Nina

August 27, 2011

A quick second post for today to get caught up on my 365 Card Challenges. Today Day 180-Combo Challenge info is as follows:

Take three 365 Cards challenges, one each from May, June and July and combine them to create your own unique challenge.

Here are the challenges that were picked:

May-Day 84-Ruffles
June-Day 118-Sunday Sketch
July-Day 148-Sentiment Background

This is the 118-Sunday Sketch.


I am not sure how well I managed to incorporate these three items but here goes.

I used the lace (ruffled) and pearl ribbon, I loosely interpreted the sentiment back ground by embossing the upper part of the card with Cuttlebug Script embossing folder. I do think I managed to follow the
sketch reasonable well though :)

I was not able to get the right angle for this picture to show the pretty glitter on the designer paper, or the pretty sheer shimmer mist I sprayed on the flower. The Happy Anniversary sentiment shows a little darker on the card  as well.

Supplies: Natural white and gray cardstock, Designer Paper-K&Company, Fiskars-All your Greetings, Spellbinders diecut, misc lace and pearl ribbon, Sheer Shimmer.

Cheers,
Nina
Happy Saturday, a new card combining two challenges and more excitement.

My card from the 365 Card Challenge -Day 171 was chosen for Spotlight Designer. Here is a little more information from the 365 Card Challenge site:

Spotlight Designers

For each Sunday-Saturday period, the Design Team will select 7 cards (one from each day) that we would like to acknowledge for the respective designers' talent and creativity.  The entire group of 7 earns a Spotlight Designers credit and can post the corresponding badge, which can be found in the sidebar, to their blogs.”

Now for the new challenge, I am still a day behind at 365 Cards Challenge and I do hope to fix that today, but yesterday's challenge first.

Day 179-The challenge is called Boy Meets Girl, and here's why:

“Use girly papers and make a card for a little boy, or take paper suitable for a little boy and make a card for a girl.  It's that simple.”

"This week we are looking to see your Back to School Something's. The kids will soon be heading back and summer fun will be over, but let's celebrate getting back to school with some cards and scrapbook pages or even teacher gifts." 

I wanted to be practical about this challenge, so I combined it with the Stamp Something challenge-Back to School Somethings. I decided to do a card for my son, I realize he is not a little boy... he is my baby though. This is a big year for him, his final year of high school, I think everyone in our house is a little nervous and excited so why not celebrate with a card.

To cover my Boy meets Girl challenge, I used a bright green glitter paper as a layer in the card and match it with a pretty sheer green ribbon. I am sure he will forgive me... sometime J. for the both the card and calling him my baby. In truth I like how the card turned out.


I found this great image on a website called Guild Tales. I used Microsoft word to print the sentiment, and both images, the little element of a pen is from Word clip art, then all glossed up with a couple layers of clear embossing powder.

Supplies: Kraft cardstock, Designer Paper- Reflections Signature, TPC Studio, Microsoft Word, Guild Tales image, misc ribbon.

Cheers,
Nina

August 26, 2011

Two card challenges and a Glam Squad cheer :).

First off yahhhh. I am soo excited, I joined my first Friday Mashup last week and my card was selected as one of the Glam Squad.


It just so happens that my post is for this weeks Friday Mashup, I though I would combine two challenges with one card as I am behind a day with the 365 Card Challenge. I am trying for a full week of a card a day.

Friday Mashup Challenge this week is Bossy and Sketchy:

So here is how we are "MASHING IT UP" this week
    1. Create a project using the provided "Sketch".
    2. or Create a project that has a "Dry Embossing on it".
    3. or "Mash it Up!" and create a card using the "Sketch with Dry Embossing".
     
The Second Challenge is for 365 Card Challenge- Day 178-Buried Deep, the details are as follows:

"Dig into your stash and crack open 2 items that you've never used before.  They can be old or they can be new, but they can't have been used."

This sketch is perfect for the card I had in mind. I used my Cuttlebug Swiss dots embossing folder to emboss all the designer paper layers and the scalloped circle, I used a brand new stamp from my Inkadinkado Dot Flourishes, I also opened a new package of Crystal Stickers.

The focal image was first stamped with Stampabilites- Faded Text Background, I then stamped a Flourish and used a Tombow glue pen to follow some of the dots and add Glitter, it turned out a little thicker in parts then I wanted but it still looks good. I used a wide variety of pearls and gems to give a unique look.

I tied brown dotted ribbon then added Sew Easy fancy floss, finishing with small bow.
I tried to angle the picture to get the gems and the glitter but I could not make it happen, so sparkly gems it is.

Supplies: Cream and brown cardstock, Designer Paper-Kaiser Craft, Inkadinkado-Dot Flourishes, Stampabilites-Faded Text Background, The Stamps of Life-getwell2you,Crystal Stickers-Gems and Pearls, Sew Easy fancy floss, misc ribbon, EK Success- Circle Punches.

Cheers,
Nina

August 24, 2011

365 Cards Challenge- Day 177- Album Inspired:

Today's challenge is a lot like an ad inspired challenge, except we're using an album to inspire our cards.

This is the album cover:


I had all sorts of idea's for this card, in the end I created little button-like embellishments with leaves to emulate them on a kite string fluttering in the air, I added rolling hills at the base of the card and some words of wisdom that I associated with the above image.. to deep with my thinking? In the end I liked how the card turned out :).

Click the image to see the card in more detail.


Supplies: Cream and turquoise cardstock, Designer Paper-My Mind's Eye, Inkadinkado-Creative Words, EK Success-Mini Punches, Sew Easy fancy floss.

Cheers,
Nina

August 23, 2011

365 Card Challenge Day 176- Water and Sand, today's challenge:

The challenge for today is to use watercolor paints on your card, and to use a sanding technique -"water and sand".

I started by making this distressed flower, I punched out various sizes of circles, then dry embossed a couple of the circles to give them texture. I then sanded all the edges and crumped them up and finished with a glitter dot in the middle.

I created my center image by stamping the sentiment with Versacolor Pinecone and embossing it with clear embossing powder. I then stamped over that with a text background image. I used my tombow markers directly on my Stampin'Up! Watercolor Trio stamps before stamping the paper. I think it turned out rather well.


Supplies: Cream and brown cardstock, Designer Paper-Bo Bunny, Stamp'in Up!-Water Color Trio, Stampabilities-Faded Text Background, misc ribbon, glitter dot.

Cheers,
Nina

August 22, 2011

Another quick post this evening, this one for the 365 Card Challenge- Mixed Drinks. I missed my nieces birthday..bad Auntie. Happy Birthday to you TODAY Melanie. I will pop the card in the mail tomorrow, this is just a sneak peak should you visit my blog.

I had a blast with this card, my sister Barb created me a fabulous daiquiri glass for my Sure Cuts A Lot software, it was not meant to be though so I printed it off with my printer, cut it out and paper pieced. The drink contents are a beautiful Red Dragon embossing powder pinkish red infused with gold glitter. I finished the rest of the glass with Diamond Glaze.

Supplies: Cream and gray cardstock, Designer Paper-Fancy Pants, Glass Design-Barb Derksen, The Stamps of Life-minis4circles, Sew Easy-Fancy Floss, Stampendous-Red Dragon embossing powder, misc ribbon.

Cheers,
Nina
Greetings on a rainy evening, boy did it rain here today. A steady downpour from around 7:00am till about 5:30pm. The wonderful thing about that other then the plants get a good ol' drink is that it is a perfect evening to card... like I really need an excuse :).

First off hellllooo Mojo Monday :). I had no idea what I was going to do with this card. I like to take a peak at the sketch first thing in the morning then think about it during the day so I have an idea, not today though. I love how it all just came together though once I hid away with my supplies.


I have had  these 3 Fall Matstacks for years, in fact I think I brought them when my son was young and I though I might scrapbook... he is almost 18 now sooo. I was determined today though to used some paper from one of the stacks.

I love the rich autumn feel of my selection, I think the pretty sheer ribbon, brown sparkle fancy floss and gorgeous Prima flower match it perfectly. I punches out a couple of branches and clear embossed them, then secured them under the flower with a small bow from the floss. I used two EK Success punches for the edges, added pearls and voila.

As my sister keeps reminding me to share, please click on the picture below to see the card a little bigger.


Supplies: Cream and brown cardstock, Designer Paper-DCWV, TPC Studio-Flourish Text, Spellbinders- Diecut, EK Success-Border Punches, Martha Stewart Branch punches, Prima Flowers, Kaisercraft pearls, Sew Easy Fancy Floss, misc ribbon

Cheers,
Nina
Happy Monday Morning, welcome to a new week.

This mornings post is for the Clean and Simple Sunday Challenge #20.


Isn't this Hi. stamp cute, it was in one of the $1.50 bins at Michaels. Both sentiments and the button are embossed with clear embossing powder, the sentiments were stamped with Pacific Versacolor. I love this Stella and Rose double-sided paper, I think it was great for this card.

 Supplies: Cream and brown cardstock, Designer Paper-Stella and Rose, Spellbinders die cuts, Gstudio-hi, The Stamps of life-kids2love, Sew Easy Twine, misc EK Success punches.

Cheers,
Nina

August 21, 2011

One more post for today, I think this has to be a record for me however I might forget if I don't post a card right away.

This is for 365 Card Challenge Day 174-Super Sketchy Sunday. This sketch makes me think masculine card so that is what I did.


I am not sure what dimensions are expected but I made mine approximately 4 1/2 by 4 1/2. There are tons and tons of layers here, from bottom to top there are 12 all together but I love how it turned out.

In addition to layers I also did a little embossing. The center piece us a fabulous stamp from The Stamps of Life, I used Versacolor Pinecone and clear embossing powder. I though it would be a little darker but I am happy with the end result I did however add an additional sentiment.

The buttons of course are embossed and have gold filament embroidery thread in them.


My sister Barb will be so proud of me for attempting a macro shot.


I don't remember a day or even a weekend when I have had so much craft time. I has been fabulous.

Supplies: Cream and brown cardstock, Designer Paper-Hot of the Press, The Stamps of Life-sentiments4circles, Stampin' Up!-Birthday Whimsy, misc punches, embroidery floss.

Cheers,
Nina
Second Challenge post for the day. This is for 365 Card Challenge Day 170- Vintage Plus Blue.

Images from The Graphics Fairy there is some fabulous Vintage image on this site. I used my mini Bowdabra for this pretty little twisted bow.

Supplies: Cream and brown cardstock, Designer Paper-Authentique, Images-the Graphics Fairy, TPC Studio-Brush Stroke Greetings, Making Memories antique brad.

Cheers,
Nina
Back to blogger... for now. I am still trying to get the hang of Microsoft  Live writer, I just need to take the time to get it tweeted, till then however I will post via the old fashioned route.

Happy Sunday all, the sun is playing hide and seek with some fluffy clouds here in Victoria I hear rumors of rain tomorrow :( so I am going to head out for a walk after this post to enjoy while I can.

Challenge for this post 365 Cards-Day 170 Vintage Plus Green, I am all over the map with these challenges. I can't seem to get the order right. I will post Vintage Plus Blue a little later.

Look no glitter... well I can't say that for sure.. the stray little glimmers are EVERYWHERE. I am told to embrace it :)

I love this Vintage style designer Paper from Stamp'in Up with matching stamp set. I kept the card simple.

Supplies: Cream and green cardstock, Designer Paper-Stampin' Up!, Fiskars-So Much Thanks, Stampin' Up-Nature Walk, EK Success Punch, Kaisercraft gems.

See you soon,
Nina

August 20, 2011

Another challenge post, and again I have managed to mix two challenges in to one card.

FM#12-Sweet as a button:
  1. Create a project using Buttons .
  2. or Create a project featuring "Cupcakes".
  3. or "Mash it Up!" and create a project with Cupcakes & Buttons!
Stamp Something-Something to say Thank you.

This week our challenge is simple, just create a thank you something.

So I though it would be fun to try to combine these two challenges.
I think this Bo Bunny designer paper is so cute, I guess I did not realize it was probably a winter paper till I started this post… the name of the paper Organic Snow drop :). To me it looks like a fabulous array of buttons, so in my mind that is what it will be.

FM#12

I love making buttons so this was a no brainer for me, however I have a new die cut from Joy crafts that makes these wonderful little buttons so I embossed them and added floss and all was great.

I paper pieced the cupcake from a Fiskars stamp, the bottom I glittered up with bronze ultra fine glitter, the top I covered with Diamond Glaze and sprinkled lightly with some warm highlight glitter to give a tiny bit of sparkle. The cherry on top is a Holiday Dot.

Supplies: Cream and burgundy cardstock, Designer Paper- Bo Bunny, Fiskars-The Sweet Life and So Much Thanks, Joy Craft-Die cuts, misc embroidery floss, Jewel Glitter Ritz, Dress it Up-Holiday Dots.

Cheers,
Nina
Glitter glitter on the floor, glitter glitter on the desk… in my hair and everywhere. I use a coffee filter to sprinkle my embossing powder and glitter over when making something sparkle. Apparently I did not put away the remnants from my last glitter adventure. I don’t believe I have seen an actual glitter cloud before. I made the mistake of snatching up my coffee filter without checking if there were contents…. Thank goodness for my Glitter Clean up cloth, it made short work of the clean up for the most part.

This post is for Clean and Simple stamping FTL154, they have teamed up with Jingle Belles for this challenge. The sketch is fabulous however my little internal jury is still out on my card.


I cut the large snowflake out using a Be Creative Tape sheet and my Cricut Winter Lace, I used Canadian Blue Jewel Glitter Ritz to make it sparkle. I stamped some smaller snowflakes with my glue pad and also sprinkled them with glitter. The remaining snowflakes and sentiment were stamped with various VersaColor mini pads.

FTL154- Jingle Belles

Supplies: Cream and blue cardstock, Cricut Winter Lace, Inkadinkado-Warm Holidays, Jewel Glitter Ritz, EK Success border punch,  Recollections/Kaisercraft pearls, misc ribbon.
Cheers,
Nina

August 19, 2011

Something a little different for this post today. First my sister Barb…. her name seems to be popping up a lot these last few days... ok, so the something different, I am trying Microsoft Live writer for this post. I have never used this software so I am preparing for some interesting effects.

I made a card for the  Clean and Simple Sunday Challenge #19, when I was on vacation but obviously did not post it. So here goes, I am not sure if I like this card yet, my sister took a great photo but I am not sure it really does the card justice.

Thank you Brenda for a lovely sketch:
This fabulous paper is not displayed as nicely as it should on this card I think though it is just the way the sun washed it out a little at the time of the snapshot. It is double-sided, the background is a perfect contrast to the beautiful front which is a mixture of blues and greens with the flowers outlined in gold foil.

Nina_CASS_19full

I found this image online, it gives a little better idea of how pretty this paper is.


Supplies: Cream and brown cardstock, Designer Paper- S.E.I, TPC-Flourish Text, Recollections- Flower embellishment, misc twine and circle sticker.

Cheers,
Nina

August 18, 2011

A quick post for 365 Cards, the challenge today-Vintage Plus Pink. I have this beautiful vintage paper from TPC Studio called Grandma Attic, I think it may be more peach than pink but it was calling to me for this challenge.

Supplies: Cream and brown cardstock, Designer Paper- TPC Studio, TPC Studio-Brush Stroke Greetings, Hero Arts lace ribbon, Stampin' Up- Rosettes Vanilla, misc pearls.

Have a  fabulous evening,

Cheers,
Nina
Looky Looky here, a card I forgot to post while doing multiple challenges with my sister Barb. Did I tell you she is crazy... about making cards. My dear sister is an amazing artist... that is right artist. Painter extraordinaire, Digital Scrapbook star, and designer, she makes the most amazing elements for her new Silhouette. Her new love however is making cards. She combines all the above most days and truly inspires me. I think this was the last card we made together my last day visiting with her.

This card is for the 365 Challenge-Day 167-Super Sketchy Sunday.

I brought a new 6 x 6 Stella and Rose pad, I love love love it. So much that a couple of the pages I also brought in 12 by 12.. again shopping with Sis in Kelowna. Can you tell that I had the most amazing time,  I might stop going on and on one day soon :)

Anyway, this card was so fun to make and easy too because it seemed to just flow. I did not take a lot of craft supplies on my trip but I did make sure I brought my The Stamps of Life binders. It seems the more I use these stamps the more I love them. With this card I used my butterflies2build set and hip2be stamp sets.

I started with my papers, measuring them all out. Next was the main focal point which I made the butterfly, I stamped it multiple times then cut it out and embossed it using clear embossing powder. I use my Versamark Dazzle to give an under lying sparkle. I also popped the bottom part up to give it more dimension. I finished with the the flight path which I stamped them used a Gelly roller Clear Star pen to add a touch of glitter to each dot.


I have been doing so many challenges lately I wonder if I am going to make something off the top of my head :) without a sketch to follow. Maybe I will make that my goal this week.

Supplies: Cream and turquoise cardstock, Designer Paper-My Minds Eye, The Stamps of Life-butterflies2build and hip2be, kaisercraft pearls.

Cheers,
Nina

August 17, 2011

A quick card challenge post. This is for Cards for Men-Challenge #17 Anything Goes and a second try at Mojo Monday.

Isn't this stunning paper, I found a small stash of musical paper at one of the stores in Kelowna. I love the gold foil music notes and the background colour almost looks like crushed velvet or suede. I though the current Mojo Monday sketch would be perfect for this card. The challenge for Cards for Men did not have any requirements other then it be for man or boy. This card (shhh) will be for my brother in laws birthday in Oct. I know my sister will not say a word..... right big sis.

I used my Sure Cuts A Lot software to cut the large music note with my Cricut twice, the first cut was with brown cardstock the second with a Be Creative Tape sheet. I followed my sister Barb's example by ultra fine glitter to the emelishment and popped it up on a layer of brown cardstock for a 2D look. I love how Samantha used folded ribbon on her Mojo card so I tried that as well. I made some glue dots with Tombo multi glue and glitter for the finishing touch.


Supplies: Kraft and Brown cardstock, Designer Paper-Penny Black, Sure Cuts A Lot, My Creative Tape Sheet, Jewel Glitter Ritz, misc ribbon.

Cheers,
Nina

August 16, 2011

Happy Tuesday,

It is sure nice to be home, although it means that my vacation is only a day from being over it is good to be in my home setting.

My sister was floored when I zoomed away from her place at 04:45 on Monday, the stars and moon were still out and the sun had not even started to peak over the horizon in her little pocket desert.  I however love how the roads are almost empty, and the empty desert road between Osoyoos and Keromeos is very dark with only night creatures out and about and it is such a  peaceful drive. There is also sheer beauty in seeing the sun come up as you drive along.

Enough of that, this is really a Mojo Monday post. I had time yesterday once I got home to make a card but I was content with un-packing and doing laundry. Today though I was free and clear to sit down in my craft area.

Isn't this a great sketch, today for me it was perfect for a masculine card. I used several different sections of a Hot Of the Press-Masculine sarapapers, I embossed each section with a Cuttlebug embossing folders. All the layers are popped up with foam tape.


Supplies: Kraft cardstock, Designer Paper-Hot off the Press, The stamps of Life-Happy2beCircles Set #8, Cuttlebug embossing folders, Spellbinders Nestabilites.

Cheers,
Nina

August 14, 2011

After a side trip to visit more family and friends I am back in the Okanagan for one more day with my Sister and it is a perfect day weather wise for a couple of sisters to craft.

We have been doing challenges left and right and the one that I will post today is from Stamp Something , this challenge is the Dog Days of Summer - See this excerpt from the site. "This week we are celebrating the Dog Days of Summer and would like to see your creations using dog or summer images, papers, etc. you can make a card or scrapbook page or even an altered item."

I had grand visions of using a fabulous hammock stamp but in the end I made the card almost simple. I used some designer paper I picked up from Michaels and added layers to the card. I then stamped multiple sentiments from my island2visit stamp set and layered them at different heights with foam tape. I finished with a little string wrapped around a section and a couple of circles I embossed with clear embossing powder. The top one has the cutest little sea star stamped on it I also separated them with foam tape.


Supplies: Cream and Blue cardstock, Designer Paper-, The Stamps of Life-island2visit, misc blue twine, clear embossing powder.

I head back home tomorrow, vacation time is almost over :(. I am hoping to get a little time to return comments and visit some blogs I have missed while vacationing over the last couple of weeks.

Cheers,
Nina

August 11, 2011

My sister Barb talked me into trying a new card challenge, I know I will never be able to keep up with this one but what a fabulous idea. 365 Card Challenge, a new challenge everyday. The one that I tried was Challenge 159-Opposite Day (I think this Challenge may be from last week :))


I chose opposite colour, or monocrome from this challenge. I love this designer paper, it almost made the card for me. This designer paper is double sided so all the guess work was done. I simply added a sentiment and embellishments. I love how it turned out.


Supplies: White and Black cardstock, Designer Paper-My Minds Eye, TPC Studio-Card Crafting Hello, Recollections Floral Embellishment, misc ribbon and gems.

Cheers,
Nina

August 10, 2011

Happy mid-week, I am having such a wonderful vacation. This morning was a little shopping downtown, then to a few wineries to stock up. I tend to buy a good number of bottles of wine to take home to my husband and we taste them together. Barb and Miles are ever so patient with my as I rattle of my little list of wineries I would like to visit. Every year there seems to be new ones popped up, I have to admit I like the more established ones.

Love this beautiful hot weather, we have spend some quality time down by the lake. There is a storm coming and I am hoping to see some lightning over the lake this afternoon. We don't get much lightning on Vancouver Island so I love a good lighting storm.

Now for a card, I managed to get one done for Clean and Simple Stamping. I made this earlier in the week with my sister Barbs supplies and I think I did ok :).

This is such a fabulous sketch please see Clean and Simple Stamping-FLT152. Again thank you Barb for your fabulous picture taking of my card.


I used my Stamps of Life-friends4ever stamp set for the leaves, I cut them out and embossed them with clear embossing powder. I used 2 layers for the 2D look. I also used this stamp set to enhance the die cut that my sister made with her Silhouette.

I added twine to go with the button and finished with some gems. I am sure I made this a little more complicated then simple but I had such fun making it.


Supplies: Cream and brown cardstock, Designer Paper-Memory Skor, The Stamps of Life-friends4ever and getwell2you, misc button,gems and twine.

We found two wonderful craft stores in Kelowna and I ended up spending a little more money then expected, but I don't feel an ounce of guilt and I can't wait to dive in and start using all my new treasures.

Cheers,
Nina

Cheers,
Nina

August 8, 2011

I am loving the sunny hot days in the Okanagan, even better that I am spending time with family. We headed down across the border to Omak today, we did not find much in the way of craft supplies but we did have an amazing lunch at Rancho Chicos.

We also pick up a previously shipped order down in Oroville of Blonde Columns cardstock from The Paper Company. I use this as a card base for most of my cards however Michaels in Canada no longer carries it. So my brother in law orders it for me and I get it as a gift when I arrive. This time it was 2 packs of 100, I have to be careful of drool as I would not want the cardstock to get damaged :)

We found it was a little to warm outside when we got home so we decided to head downstairs to the crafting heaven in the basement to tackle Mojo Monday 203, what a fabulous sketch. Once again I was foraging in my sisters supplies and I think I found some great materials for this card.

Today's Mojo Sketch:
I still managed to entertain my fascination with embossed buttons, the circles and scallop were cut out on my sisters Silhouette (thank you Barb) and then I embossed them with clear embossing powder. The little pearls were stripped from some ribbon that had it as edging. Fabulous photos by Barb Derksen.

Barb has posted some amazing templates and Silhouette files on her blog.. for free, be sure to stop by and take a peak. Barb has also been very active with her cardmaking, and her blog has a ton of inspirational items to get your craft mojo triggered.


Supplies: Cream and turquoise cardstock, Designer Paper-Memory Skor, The Stamps of Life-Thanks2you, Fiskars border punch, Scalloped circle and small circles- Barb Derksen, misc lace, pearls and thread.

Cheers,
Nina

August 7, 2011

A down to the wire Mojo Monday post :). Back from a fabulous time with my husband in Las Vegas I am currently visiting my sister and managed a quick craft session to get a Mojo card done. My sister Barb has this fabulous craft centre set up that created a bubble of creativity for us. I did not bring much in the way of supplies so I pillaged her stock.

Mojo 202 sketch:

I used my banners4all stamp set from The Stamps of Life, Barb used her new Silhouette to cut me the circle and the scalloped shape.


If all goes well we will be back for tomorrow new Mojo Monday Sketch.

Supplies: Cream and Brown Cardstock, Designer Paper-Memory Skor, The Stamps of Life-baners4all, TPC Studio-Thank you, misc ribbon.

Cheers,
Nina